Wednesday 31 October 2018

Celebrating 35 Years!

October 2018 saw the 35th year since the formation of the Lytham St Annes Branch of the Embroiderers Guild so we celebrated by having a little 'Bit of a Do'.


Here are a few pics from the night.


Our Wonderful Anniversary Cake

Below are a few happy members - the lady on the right was the maker of our cake, well known for her fabulous baking and jam making. Thank you A - it was delicious.


Perusing the new programme for the coming year and chatting before the evening kicked off.


Above and below, scrummy food all ready and waiting on the counter top. The quiche was really good :-)


Here is our Chairman, below, starting proceeding - unfortunately I did not get a posed for picture! duh - sorry but it was a very relaxed and happy evening.


Below, more cake under wraps to have with our cup of tea in the interval after the talk (more in the next post).


 A little formality, below. Here is a long standing member who also serves us on our committee, cutting the cake. 


Such a shame to cut into our lovely cake and spoil the decorations on it..... but it had to be done! Yum! It tasted super :-)

Many thanks to everyone who worked hard to make our evening so special. We all enjoyed the extra hour to chat with our friends.


 Here is to another wonderful 35 years of embroidery!


Wednesday 29 August 2018

The Garden Party - 2018

Each year at the Lytham St Annes Embroiderers Guild optimistic plans are made to have a Garden Party. This may be no biggie if you live in a country where you can rely on the weather but in Britain despite, global warming and the recent pretty much yearly heat waves this last decade, we still have an almost ingrained pessimism regarding our weather. 
We enjoy our short summers and joyfully go about minus coat and brolly - but we are never taken aback by a 'surprise' rainstorm or barrage of hail amid weeks of drought.... its that kind of country. 

However, a garden party is still a very genteel and 'English' thing to do and we love the images of sitting in a sunny garden, dressed in flowing romantic dresses, sipping tea from china cups and nibbling on a delicately a pretty baked confection. 
Determined to 'live this dream' we plan ahead but always have a back up plan to go inside in case of rain.

Despite having rain and windy days all the previous week bringing ending our wonderful (for us not the plants)  warm and lovely sun filled heatwave - I for one refused to believe that the day would be anything other than fine.


In fact it was HOT 


Too hot for the cakes they had to go inside! Arriving late, I just had time to grab a slice of chocolate cake and a cuppa before they had to be whisked inside to save them from melting.
I did manage to snap a couple of pics of us all sat in the beautiful garden that had beds stacked with flowers of all colours and varieties, that had been lovingly tended by the house/garden owner.(did not get to photo those, sorry. Too busy munching on cake at the same time as filling out the quiz - thank you H for compiling it for us).


Here we all are, above, marking our Quizzes. The quiz was very though provoking and brought back many memories as we discussed the possible answers - not being very competitive, its more for a bit of fun along with a Free Raffle.
You can just see the edge of the decking and the sprout patch behind on the left of the photo. Some camera shy people must have been hiding as there were more of us than this :-)

Here is another shot of the veggie garden - I was quite taken by how big the sprouts and kale was and how well it had grown encouraged by the week of showers.


A big thank you to our Hosts for the afternoon, K and R for opening their home and garden to us and running back and forth with cups of tea. We all had a lovely relaxing couple of hours - one or two of us even wore a dress for the occasion but no hats not even a sun bonnet to be seen :-) Thank you once again - we are already looking forward to eating en plein air next August.

Wednesday 1 August 2018

The Consequences of Stitching

The details of  the July workshop at the Lytham St Annes Branch of the Embroiderers Guild, was the subject of much speculation and was all rather 'hush hush'. 
Of course, I was very intrigued and couldn't wait to find out what the Secret was, especially as I was given 'strict instructions' to sit down and sew and not attempt to take any photographs during the workshop as "there is no point anyway, until the end" - which was rather a relief actually as I am usually too busy snapping to get any sewing done :-) !

Members were asked to each bring a hoop no bigger than 6 inches and our needles and scissors. Thread and fabric to be provided.


We were given a piece of fabric with 4 squares marked out with a curved line running through all four.
The theme was Flowers and we had to sew the curved line in green as this was the stem. Once the stem was stitched we could do any floral or flower design that we wished.
A time limit of 20 minutes to sew each section was set, as there were 4 each to complete and our meetings are just 2 hours long with stitching only commencing once the business part of the meeting is attended to (we also need a break and a brew as stitching can be thirsty work!)
When "Time!" was called we had to hurriedly secure the last stitch, fold over and pin our section down so that it could not be seen by  the person sat next to us, who would stitch the 2nd part of the design.
We made sure to leave a long tail of green thread for the next stitcher.

Here are the results on the table during the BIG REVEAL. I have left the photo unedited as it can sometimes be fun to spot our own hands or identify which skirt/torso belongs to whom :-)


Although we felt a little stressed and rushed at first by the last section we could see that our stitching had become neater as we had relaxed and felt more calm.
The following are close ups of the completed sections which will be stitched together to make a long cloth or banner. Not sure if this will be portrait or landscape but shall post a photo the piece in due course.


Above, are the designs laid out on the Top Row Left. 


 Above, we have the Top Row to the 2nd Left and below are the pieces laid out on next to them 2nd from the Right.


 Here are the last pieces laid out on the Top Row to the Right.

Now for those on the Bottom Row to the Left, below.

 Above, we have the Middle Section of the Bottom Row and here below, those at the end to the Right Bottom Row.

We had some quite unique interpretations and fun designs. It is amazing how fast some people can stitch! Maybe years of embroidery experience have taught them to just get on with it and not worry about the 'consequences of their stitching!'

Despite a little stress and some tutting along the way, we were all happy to have had this experience and are looking forward to seeing the completed banner. A big thank you to our workshop leader and her assistant for thinking up this activity and preparing all the fabric pieces in advance.
One of the great things about this kind of activity is that there is no UFO to take home at the end! Whats not to love? :-)
It would make a nice activity for a Girly Night In or a Hen Party for those who have out grown clubbing, or perhaps teaching the youngsters how to sew. 
Grab some friends and see what the consequences are of your own stitching.

A Gift for Her Majesty

Some time back in February, SB one of our members famed for her free machine embroidery skills, was asked by a local WI to submit a design for a birthday card to be sent to Her Majesty, Queen Elizabeth II.

The draft and sewn sample had to be sent off, approved and then the real one made by the end of March! A daunting task.
We were allowed to view it, under cover of glass, of course and I was privileged to be allowed to take photos (minus glass) once everyone had departed, that can now be finally revealed on line.

The reason for keeping it 'under wraps', was that it was unclear if the card was for the Queen's Actual Birthday on 21st April, or her Official Birthday which falls on the second Saturday in June, this year being 8th June.


The card had to be no larger than A4 size and so measures 10 x 7 inches and is landscape in orientation.
And here it is.........


Balmoral Castle and Grounds


As Balmoral Castle in the Scottish Highlands, is the holiday residence of the Royal Family and is said to be the favourite place of our Monarch,  it was a good choice.

Here, below, is a close up of the 'house' and that lovely large 'red' tree.


First the sky and grounds were painted with fabric paint on a man-made fabric called Evalon. The castle was painted on a separate piece and applied later.


The free machined trees, above and below, were stitched on soluble fabric and applied after the details on the building and turrets were completed.


I cropped this group of trees and lawn as it looks so fresh and inviting. Here it is in close up (flash version) below, as this better shows the detailed stitching.


And once again, the whole picture. I rather fancy that this looks like a photo of Balmoral Castle in the late evening, though in actual fact it is taken without the aid of the flash in front of a window in late afternoon (the first photo in the post was the flash version that better showed the bright colours of the thread used).


After all that work, our talented stitcher, made sure to get a good photocopy of her piece and put that into a frame for herself as a memento. 
The original, of course, was sent off to The Queen. I am sure that she will be delighted with it..... I wonder where she will hang it or will she have it on a side table or desk? She must get many gifts but I am sure that this one will touch her heart. 
God Bless Our Gracious Queen
and thank you to SB our 'queen of stitch'.

The Wonderful Work of a Modern Day Textile Artist

At our June meeting, we of the Lytham St Annes Branch of the Embroiderers Guild, were treated to a lively talk given by the friendly, and great fun to listen to, textile artist 
Jacqui Smith
Relating her story; from her first experiences with the textile art form and influences by a fabulous art teacher at school, Jacqui kept us entertained with amusing anecdotes of her education, training, struggles and accomplishments, whilst giving us an insight into her work and techniques.

Jacqui has worked in quite a few disciplines, from silk painting to dyeing and weaving with her own yarn; she has been a College Tutor and a Professional Artist selling work to galleries and private clients. Today she enjoys working working on silk, cotton, canvas and hand made paper as seen below, in this beautiful duo of poppies.
Her love of colour and texture is evident and pieces are painted and built up with collage elements before stitching with free-machine embroidery.
Jacqui told us that she likes to work on a few pieces at once and tends to make a series so that she can really explore a subject. These are two more in the Poppy Trio and are just as vivid in colour as the first, but unfortunately due to being behind glass and the new lighting in our meeting room, it was difficult to capture a true likeness. 
You can, however, see the layers of paper and the stitching on this large Poppy Head, below, that is embellished with beads.


This fun Washing Day picture, above, is one of my favourites. Its so bright and cheerful. 
See the detail of the washing line made of wire, below, and the wooden post.
Love the large flowers in the foreground, with beads added for extra sparkle. The sense of perspective, giving the illusion of a wide open space, full of sunshine makes me want to step into the picture for a visit.

These two cats are from a larger piece that has at least 9 cats in different frames and settings, each with its own personality and markings.


Above, you can see some of Jacqui's stitched words and little details like paw prints that made for a jolly look.  As well as different papers, she likes to use scraps of fabric or manuscripts and keeps to the same mono-filament thread in the bobbin of her machine just changing the top thread.


This is a happy Ginger Tabby, above, with a small head on a large, plump body he has a whimsical look about him. 


This piece is called Roof Top Meeting and is quite a large piece, incorporating gold paint to great effect to show a moonlit night.

Two more  Late Night Prowlers, below, this time having a chat on a brick wall. The flash has picked up the textures of the background materials and the ruffled fur of the two tom cats. It had a purplish hue to the night sky.


That is all I managed to quickly snap after a very interesting and jolly talk. If you would like to see more of Jacqui Smith's work click on this link here
A big thank you to Jacqui for travelling a considerable distance in the evening to come and speak to us and let us view her lovely work. 

Tuesday 31 July 2018

Delicate Butterfly Wings

In May following the Cutwork Folios (see posts here and here) we had a member led workshop on Cutwork where we made a delicate 3D Butterfly.
Here is the 'Teacher's Desk' out front.


Everything was prepared for us, the butterfly already marked out in Frixion pen, even a Worksheet - all we needed was our basic sewing kit and a 6 inch hoop.
First, taking 2 strands of embroidery floss, our task was to sew Double Running stitches around the red lines, stopping at a certain point marked on our Worksheet, to take 3 bars across and work Button Hole stitch over them.


Once the three bars were secured then buttonhole stitch was worked over them and the double running stitch all around the shape, as in the example, worked in white thread below.


All four of the large red shapes were worked this way taking care to make sure that the buttonhole loops were worked in the same direction. The small shapes did not need any bars.
Below, is the detailed sample showing the direction to work in and points to stop and make bars. It was really helpful that this had been photocopied onto our detailed work sheet as well.


As our butterflies were to be 3D, starting at the butterfly head, we Couched white cake wire down around each wing, pausing at the body to take the wire down through the fabric to come up at the wing on the other side. 
The wire was then covered with buttonhole stitch making sure that the loops faced outwards away from the wing.
A line of double running stitch was worked between the wings and also covered with buttonhole stitch.
After carefully cutting out the butterfly, it was attached to ready prepared fabric that had been fixed onto heavy weight iron-on vilene and cut to a size to fit a box frame.
Double running stitch attached the body to the background fabric and random stitches padded it out before Satin Stitch was worked over it and antennae stitched on.
The wings could be bent up slightly before placing in the frame.
Here is the finished Butterfly, in its frame, made by our workshop leader and teacher SB. 


The batik background fabric goes very well with the variegated embroidery thread and the white box frame is the perfect setting for the butterfly.
As our workshop leader always tells me, choosing the right frame for you work is important. You do not want the frame to clash or clamour for attention with your carefully sewn piece. The same goes for any work be it embroidered, painted or drawn.
A big thank you to SB for her hard work both creating the Cutwork Butterfly and preparing all the samples, marked designs and very detailed work sheets.
When a workshop goes so smoothly it is always due to months of preparation. We certainly appreciate the effort that goes into our enjoyable evenings. Thank you ladies.

Monday 30 July 2018

Machine Embroidery finds a Voice

In April the guest speaker at our North West Regional Day for members of the Embroiderers Guild, was James Fox, a local textile artist from Lancaster.
James entertained us with amusing anecdotes whilst enlightening us on his inspiration and  reasoning behind each of the pieces he brought with him that day, some of which have a serious message belying the pretty and delicate nature of the fabrics used, many from Liberty and some donated.
Here he is below, posing for a photo with his quilt called Liberty.

The Liberty of the quilt is not just the make of fabric but also signifies 'Freedom of the Press' and Blue was the colour of John Wilkes, an outspoken journalist and London politician of the 18th century who came to be regarded as a champion of liberty.

Here he is below, looking rather dapper, as indeed he was.


Unfortunately for John Wilkes being a Dandy did not stop people calling him the ugliest man in Britain but all was forgotten once he opened his mouth. A very good speaker, he could win many people over with his way with words and became Lord Mayor of London in 1774.

Look carefully at a James Fox quilt and you may be surprised to find an image of a gun or three, appliqued among the flowers.

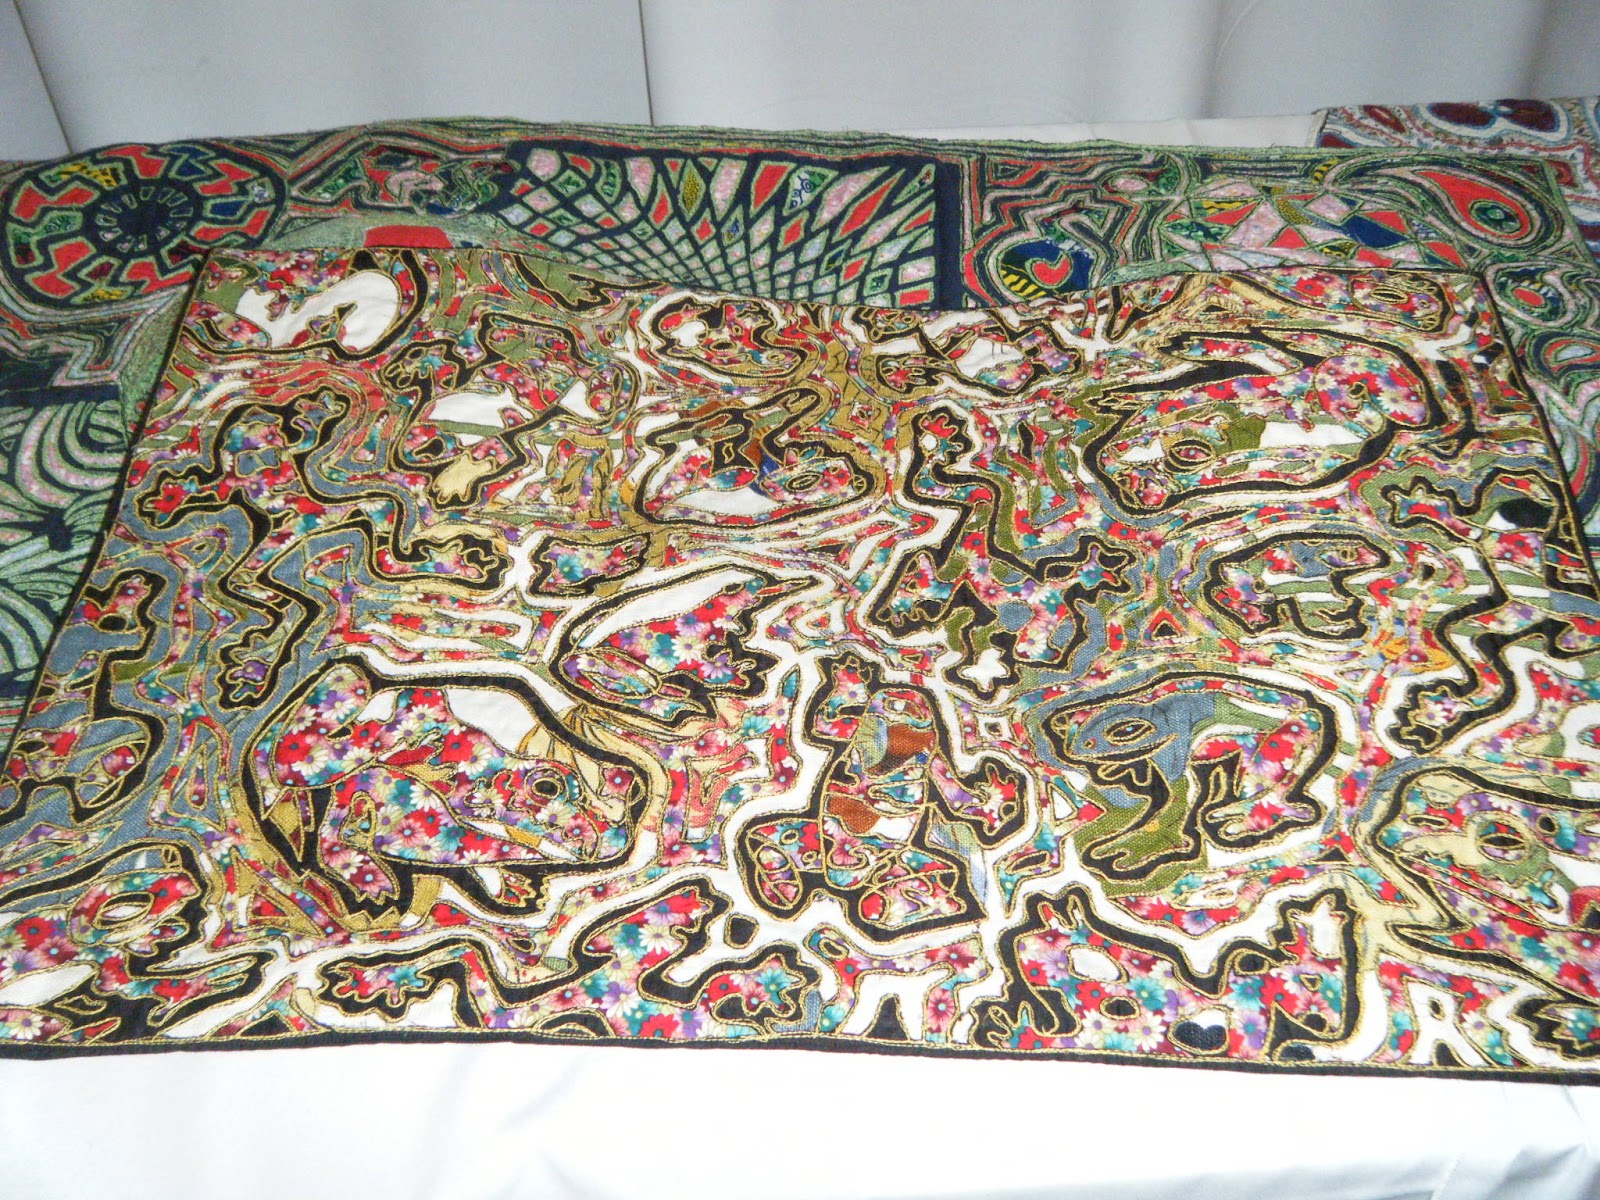
Here is a lovely green, red and black quilt with quite a busy floral pattern. Can you see the hidden creatures?

 I could not resist a close up of these lovely fellows, above and below.  I have always thought that frogs are rather pretty and they do come in a variety of colours in real life too, though not perhaps in floral designs :-)
Reverse applique and free machine quilting are the mediums that James likes to use.
After redundancy in the 80s he attended Art School which shows in the detail of his drawings. 
After getting a feel for his subject by drawing various versions, the final design is traced and reversed onto a base fabric that has a few layers of patterned and plain materials on top.
A free machined straight stitch sandwiches it all together on the reverse side first (one such WIP he was kind enough to show us) until the details are added and layers can be carefully cut away.  Raw edges are covered over with further stitching.

James' work is constantly changing along with society and its expectations. Several works have come into being whilst he made investigations into the craft and careful workmanship that went into the making of protest and trade union banners of the past.


Here is one such that I was drawn to, called Educate. 

The other two in the series are Organize and Agitate.

These next two works could be considered at first glance to be exploring the theme of clothing, but looking closer and you see the darker message.

Below,  in the piece called Non Uniform Day, policemen are dressed in 'Liberty Print' boiler suits to make the point that 
 Love changes things not Hate. Many of us remember the miners strikes of the mid-eighties and the action taken against them that shocked Britain.


Am not sure of the title of this piece, below,  but this is a new kind of 'Riot Gear' that sends fear into people's hearts. The eyes had a quite disturbing effect on me, even though we are, sadly, used to seeing such images on TV.


In this last work, the face of a homeless man, is less intimidating but again an all too familiar sight on our streets. However, there is a quiet strength and dignity about him, that the monochromatic colour scheme highlights.


If you are eager to see more of  James work and see his latest exhibits, click here to go to his website.
I would like to thank James for his permission to photograph and post his wonderful work and for sharing the stories behind his pieces. Long may he continue to stitch and inspire.