Monday 27 November 2017

Finished Feathers for the Paisley Peacock

Do you remember this post showing Paisley Feathers that we were busy working on in the afternoon of our recent North West Regional AGM of the Embroiderers Guild?
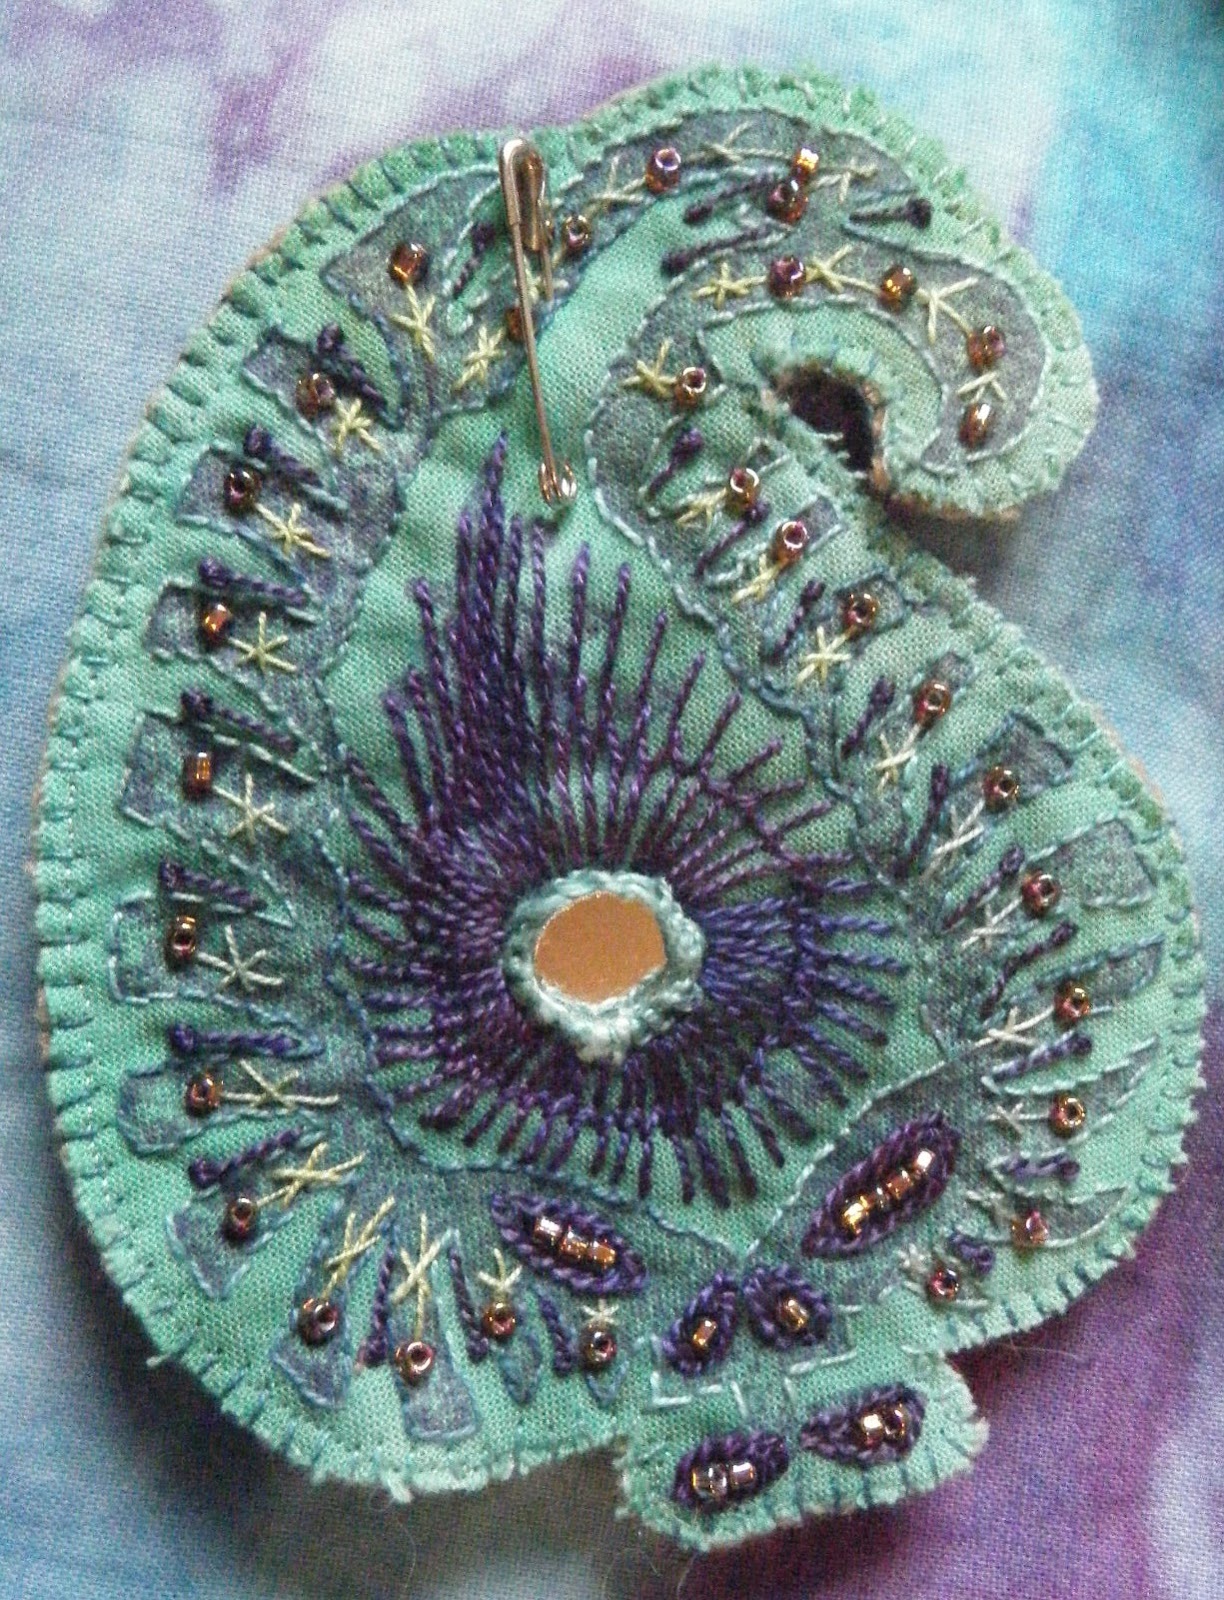
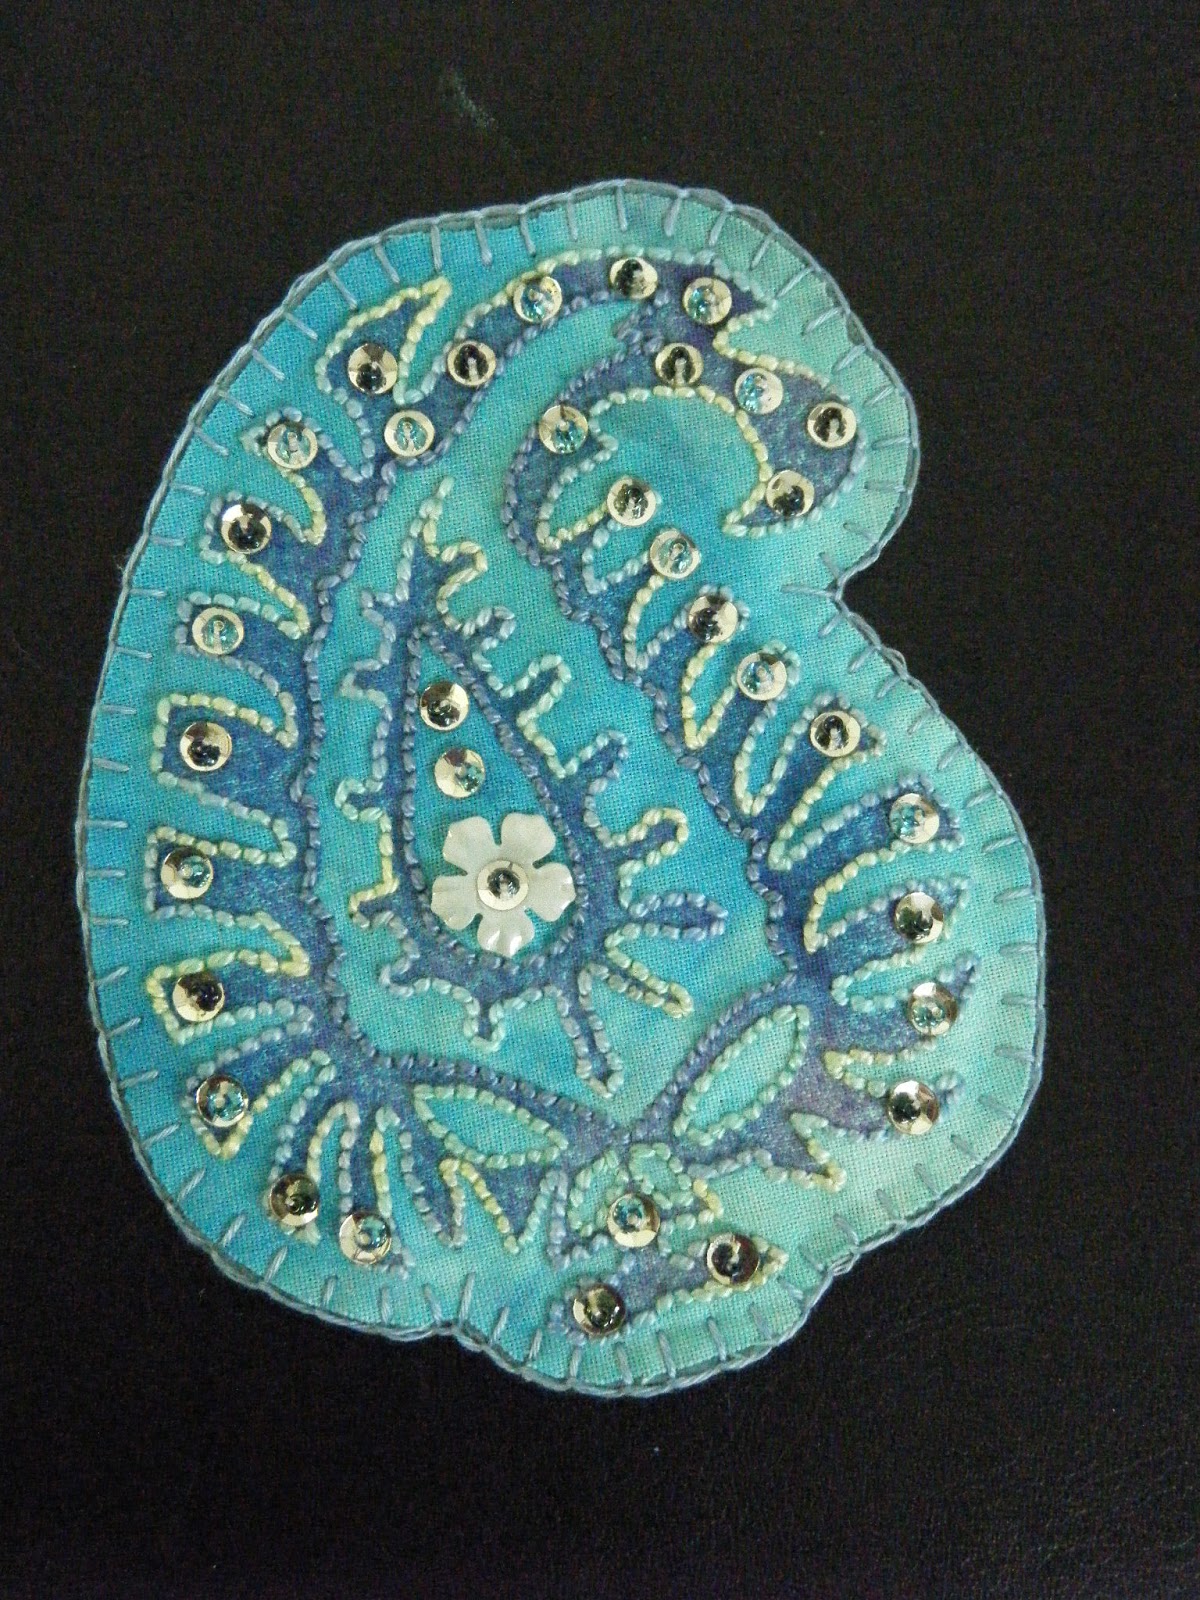
Here is a little update showing you the finished results. These are 4 that were brought to our last meeting. 


 And here they are are again shown separately in close up to allow you to see the lovely details. The beads inside the chain stitches are really effective and give a sumptuous look with an easy stitch. Love that idea!


Chain stitches again below, with button hole wheels and satin stitch flower. There was an ink stain from the flower print so this was hidden by adding a little fly :-) an idea given to me by a lady at the Monday 'Sew In' at Ansdell Library ( 2 pm - 4 pm, anyone is welcome to bring their own project and stitch whilst enjoying friendly conversation).


Here is another Paisley that is the same shape and design as the one stitched by but looks so different. The centre small paisleys are chain stitched and sequins add sparkle. 


 A totally different design using Satin stitches, detached chain and blanket stitch along side straight stitches and pearl beads look very pretty.
Very tiny back stitches and little sequins make a beautifully executed piece. 


We really enjoyed this activity; set for us by Sandra Kendall of the North Lonsdale Branch and can't wait to see them all in situ making up the tail feathers on the Peacock Wall hanging. Its going to look stunning.


Tuesday 31 October 2017

A Few More Lines and some Butterflies

Here is more stitched goodness from the NW Regional AGM Day for you to enjoy.
Remember the Four Lines Project? (see previous posts here, here and here) Below are yet more lovely embroidered and embellished Lines.

 This brightly decorated Blue piece, above, was really eye catching. Here it is again (without the flash) so that you can see the cacophony of stitching in detail. It reminds one of fireworks so is very apt for the season.
 A good idea is to put your work to good use by making it the decorative interest on a box or a cover for your 'tech' as the stitcher of this calm green and amber coloured piece has done below. 

 They have also changed the shape by using points on each square and cutting the base fabric into an octagon. Very clever. It is a very luxurious looking pouch indeed.
More colour below, with this Purple Blue piece showing Fly, Pistol, Bullion and Seed stitches with French Knots and Button Hole Wheels.

Another unusual and unique Four Line piece is this Floral Tribute to common garden flowers, some are classed as weeds even. What a lovely idea. 

Here we have some of the Butterflies stitched on this years National Day of Stitch in August. Read about it here in this post.

Lovely quilted butterflies, above and below more colourful stitched butterflies adorn a tree to make up a pretty wall hanging. Very sweet.


Thank you to the members who stitched these lovely pieces for allowing photos for our Blog.

The Journal Cover Competition

Each year the NW Region of the Embroiderers Guild produces a 'Journal' that has a small paragraph/mini report of the activities of each Branch in the region which is often accompanied with photos of members/projects.
This year a competition was held to pick an embroidered piece for the photo on the front cover.
Here is a piece stitched by one of our own members of  the Lytham St Annes Branch.

Visitors to Lytham who have ever walked the full length of the prom toward Fairhaven Lake should recognise this delightful Summer House so accurately depicted below. 


The colours are much brighter in reality but the flash version did not show all the detailed stitching which has gone into this lovely piece.


The Winning Piece was an unusual Grey Giraffe, so look out for it on the cover of next years Journal that should be out in April 2018 in time for Regional Day.

The Paisley Peacock Challenge

For the past few years at the Embroiderers Guild North West Regional AGM after morning business is concluded, we have had a relaxing stitching activity in the afternoon.
You may remember the Circles and Four Lines previously posted? Now created for us by the same talented and very creative lady, Sandra Kendall from the North Lonsdale Branch; we have Paisley :-) Wow! Just where does she get her ideas? and how wonderfully generous she is in preparing for us 40 individual (probably more! as there were several left over) hand dyed, hand printed, appliqued, backed with vilene and ready to sew pieces of 'paisley' for our activity.
Here are some of the samples Sandra stitched ready to give us some inspiration. You will have to read on further to find out why there is a safety pin in each one. Meantime enjoy the lovely, brightly coloured threads and stitches on each paisley piece.


 Pretty turquoise with a shisha mirror and beads, above; and below, lines of feather stitches frame the beads in centre.


 These two paisley examples have an appliqued piece in their centres, the one above has a printed flower that has been embroidered.

 Whipped or Ribbed Spider Webs aka Wheels in the centres of these two above and below. The lilac paisley has variations of Button Hole stitch and the blue below uses a variegated pink thread to good effect to make Chain Stitches.

And what are all these Paisley beauties for you may wonder? Well, ponder no more! Here he is waiting for the rest of his tail feathers to be stitched by our members. This lovely Peacock will make a sumptuous wall hanging once he is complete. 
You really need to see it in person to imagine the scale - as true to form Sandra has come up with another very Big Idea. 
We can't wait to see the end result next year. Meantime we are busy stitching and embellishing our individual Paisley Feathers to send off to be added to the Peacock Tail.
Here is one in progress stitched by a member of the Lytham St Annes Branch.

The Button Hole Wheels will have silver beads in each centre and the flower still needs to be Satin Stitched. We are all really enjoying this challenge and would like to thank Sandra for all her hard work in preparing such an lovely activity for us.

Beautiful Bunting and Summer School Projects

Another Embroiderers Guild Branch 'Challenge' was to make a line of Bunting where each flag was a stitched work that represented the member's birth month.
Here a couple of flags that I managed to snap before I had to head off and grab lunch.
These Birthday Month Pennants were stitched by members of the Rochdale Branch.

A jolly Snowman with icicle beads, what a great idea! for January followed by pretty flowers in February with button centres. Who doesn't love using buttons in this way? :-)

 Here we have two pennants for May - Needle point above, beautiful colours and beautifully stitched; and below, are gorgeous butterflies. Nice work.

Quite a few people also brought in their finished projects that were  started at the recent Summer School held at Waddow Hall in Clitheroe. Again I just managed to photograph a couple as some people left after the morning business session was concluded taking their work with them as they had travelled a long way to be with us which was much appreciated.


The fish above, is on a background made in the class taught by Kim Thittichai, see post and this one,  to look at more backgrounds made with paint and a fusible textile. Fabulous embroidery and what a lovely way to use up a bit of lace as air bubbles in the water?
You may have seen another Heavenly Bluebird stitched from the same kit by Nicola Jarvis but this one had its beginnings at the Summer School, see post here.


Its a really lovely design to embroider and as you can see stitches up beautifully as does the Robin also worked in Crewel wools, below. Simply gorgeous.

To see more lovely stitched goodness look out for the next 4 posts coming up soon. Thank you to all the talented embroiderers for sharing their work with us.


Thursday 28 September 2017

A Little more Drawn Thread Work

After all the busy'ness'/business of the AGM, Subscriptions, Competitions and the essential tea and coffee break, of our last meeting at the Lytham St Annes Embroiderers Guild we finally settled down to a little stitching! 
This was the second part of our workshop in Drawn Thread Work, see the previous posts here and here.
It turned out to be a 'very little' so no photos of works in progress, am afraid but here are a couple of Samples of the new stitches we were learning, that our Tutor, the amazing Linda Bedford, had whizzed up for us beforehand. 
This is Interlaced Hemstitch that is worked on a section that had 8 threads withdrawn and the top and bottom was worked in Hemstitch over 2 threads (this is called Ladder Stitch).

 Working the top and bottom rows again in Hemstitch over 2 threads to prepare the edges, a Diamond Hemstitch is then worked in the centre over the threaded area that was left untouched. Shown in Orange thread, above.
Here is the same Diamond Hemstitch pattern worked in a dark navy thread, below.
 The Diamond Hemstitch was worked in the section you see below that has 4 weft threads removed, then count down 4 threads and remove 4 more weft threads. This leaves a section untouched in the middle on which to work the Diamond Hemstitch pattern.
 Coral Knots, above worked in pink thread, have had 10 weft threads withdrawn and the top and bottom areas were worked in purple flossed Hemstitch over 2 threads.
Four Sided Stitch shown on the top row of the sample in navy, below has been used to give a more decorative effect. The bottom row has been worked in Hemstitch over 4 threads also and this gives the coral knots a cross stitch effect in the centre.


Here is the completed Sample of Drawn Thread Work stitched by Linda. This is what we 'should' end up with if we follow the handouts.....


Top Row is the Hemstitch over 2 threads, or Ladder Stitch as it is also known when worked top and bottom rows either side of the withdrawn threads. This is commonly used to start off the pattern.
Second Row is Hemstitch over 4 threads.
Third Row Zig Zag Hemstitch.
Fourth Row the Interlaced Hemstitch.
Fifth Row Diamond Hemstitch.
Last Row the Coral Knots with Four Sided Stitch on the top and Hemstitch over 4 thread on the bottom.

We were very grateful to have Linda on hand to help especially as half of the members were beginners having missed the first workshop in August due to holidays etc.
A big Thank You to Linda for all her hard work in teaching our two work shops and for providing us with fabric, thread, work sheets and samples. 
We now have another technique in our repertoire! 
If you would like to learn about Drawn Thread Work or other types of embroidery, do come along and join us on the 3rd Wednesday of every month. Address on the right hand side bar. You will be made very welcome.

More Purple!

As promised in the last post showcasing the entries in the Novice category of the Trudi Goodenough competition this year with the theme The Colour Purple, here are the entries submitted for the more experienced stitchers.
Lovely hand embroidered Lilac Blossoms, below, with a crewel work flavour to the stitches. Very pretty.

 Next up is a splendid creature of myth and magic - a fabulous velvet Purple Dragon with sparkling silver plumes of smoke coming from his nostrils. The background fabric is fitting too as it gives the impression that he/she is in a misty lagoon or swamp.

 Canvas work Diamonds in purple and aqua with silver highlights, above. What a fantastic colour scheme and very neatly stitched.
Lime greens, yellows and purples, below, make up this lovely little cushion based around 4 lines. Needle woven flower petals give the piece a very professional look. The fabric has been hand dyed.
 A Soutache Pendant, below, looks striking in purple braid embellished with beads.
 You can read a little about the Soutache technique of braid making, in this post here
Detail of central design in close up, below.
 More striking Purple Canvas Work, below.  The one Red Square in the top right of the design gives the piece interest (apologies for the flash in the photo it was impossible to get a clear picture). You can still see the effort that has gone into the stitching and appreciate the workmanship. Love the touch of red.

Lastly, we come to the Winning Entry, below. 
This is a lovely display of Stump Work Pansies complete with a bee and small butterfly. Extremely nifty fingers stitched these delicate petals one by one with Long and Short Stitch to give shades of colour.


 And here is our Winner of the Trudi Goodenough Cup this year; Diane holding the Cup and her entry, in the photograph below. Well Done Diane!

Well thats all for now. All the work was well executed and we appreciated the work that went into each of them. Thank you to all our entrants in each category of the competition.
Which piece caught your eye and perhaps gave you the inspiration to start something in Purple of your own?
Till the next time - Happy 'Purple' Stitching!

Saturday 19 August 2017

A Lesson in Drawn Thread Work

At the Lytham St Annes meeting a couple of days ago, we had an enjoyable workshop on Drawn Thread Work taught by our long-time member; Linda Bedford.
Here is a small section of a larger piece of Drawn Thread Work that you may remember seeing here in the Exhibition Posts.

Linda always goes to a lot of trouble making sure that not only are there plenty of samples to pass around and scrutinize to see what we are trying to achieve (and aspire to!) but that we are equipped with extremely helpful handouts detailing each step as well as a little history on the technique. Fabulous when writing up a blog post :-) Thank you Linda.
For those of you that are not familiar with the Drawn Thread Work, it is a counted technique usually worked on evenweave fabric (examples in this post); traditionally Linen and is one of the oldest forms of open weave embroidery. 
Threads are removed or 'drawn' out before being stitched together around the remaining threads to form a pattern utilizing the gaps.
There are many varieties and patterns that have been developed over the centuries and just as many uses for an item decorated in Drawn Thread work, such as Altar Cloths embroidered by nuns in 13th century Germany. During the Renaissance it was used as a 'fake' lace which during that time being hand made was expensive and slow to produce.
Drawn Thread work has also been used in garments and household linens - tray cloths being a popular use today. 
Whilst categorised as 'White Work' contemporary pieces do use coloured thread as it is much easier to see, especially if you are new to the technique.
This is a sample of what we were learning in our first Drawn Thread Work Lesson.
 Top row shows Hemstitch over 2 threads, middle row is Hemstitch over 4 threads and the third row stitched is called Zig-Zag Hemstitch.
As you can see in the sample above, the fabric - we were using a Zweigart 18 count Davosa cotton fabric in Antique White with a coloured Perle no 5 thread; needs to be prepared by first marking 
the central vertical with a running stitch line using ordinary thread and a tapestry needle as the blunt point makes it easier to push the needle through the holes in the fabric.


Then counting 20 threads to the left of the central line - a pin is a great help in making sure you don't lose your place; we stitched another vertical line and repeated this again 20 threads to the right of the central line. We ended up with 3 vertical marked lines.
Linda went to great lengths to explain how to do this and which lines were Warp (vertical) and which Weft (horizontal - or 'West to East' is a good way to remember). She made a HUGE sample piece, seen below, to help us to see how to with draw the Weft threads by cutting 2 weft threads on the centre line about 2 inches from the top (as shown by the pin in photo above) then taking the first out about 3 cm past the left line and taking to the back so that the second thread could be woven into the space beyond the line on the first.
Some Teachers Go to Great Lengths to Teach their Pupils!
It sounds complicated in text but in reality was really quite easy to do once you had seen how its done or had Linda's excellent handouts that were complete with diagrams to show the method of stitching. 
The trick to the weaving part was having a tapestry needle that had an eye large enough to fit the weft thread but small enough to weave it into the top line without it being obvious. Some tapestry needles are too small and others quite large so find a 'middle' size one (you'll know once you use it).
Another method for fastening the loose threads is to sew with Satin Stitch but that method is for another day, another post, maybe.
I won't even try to explain the stitching as a diagram is best but you make a waste knot and then come up two threads below the first space - then  it was a case of following the diagrams for each different stitch to make the patterns.
 Depending how many warp threads you take the needle around and under and where - you can offset them by doing two threads beginning and end of row - makes the patterns differ.
Here are some of our works in progress below.

The sewing thread needs to be pulled firmly to make the Warp/vertical threads stay together.
Once one row is finished, weave you sewing thread under to fasten off and then start the other row in same way with a waste knot.
Above, in green is Hemstitch over 2 threads.
In our lesson we did not get up to Hemstitch over 4 threads, or Zig- Zag where the 2nd row is begun and ended with working over 2 threads and the rest of row over 4, but these are easy enough once you have gained confidence - more in next post.


 A very big Thank You to Linda Bedord for all her hard work in preparing and teaching us this lovely technique with her usual patience and expertise. We were quite a handful during the counting and withdrawing thread phase, I can tell you..... however, practise makes perfect so they say - and it is true, we went home and reread our handouts and got down to stitching and found out Oh Joy! it really is quite easy! (just like Linda had promised) once the counting, drawing out and weaving in is done it stitches up FAST. Yippee! - now we are all ready, homework done and happily anticipating our second lesson in September. 
Until then you can feast your eyes on some of Linda's beautiful Drawn Thread Works of Art coming up in the next post.